How to Install Red Hat Enterprise Linux (RHEL) 10? RHEL 10 Installation Step by Step with Screenshots.
Red Hat Enterprise Linux (RHEL) 10 builds on the solid foundation of RHEL 9, offering enhanced performance, security, and modern hardware support. It introduces advanced features such as the Stratis file system for simplified storage management, improved XFS file system with copy-on-write support, and updated container tools like Podman and Buildah. RHEL 10 also strengthens security with TLS 1.3 and OpenSSL 1.1.1, replaces YUM with the faster DNF package manager, and uses Chrony for better time synchronization. The installation process involves downloading the ISO, creating bootable media, and configuring the system’s settings like time zone, network, and partitions. Once installed, RHEL 10 provides a stable and secure environment, with the GNOME desktop by default, designed to meet enterprise needs while offering long-term support and the latest technologies.


Red Hat Enterprise Linux (RHEL) 10 is the latest iteration of Red Hat's enterprise-focused Linux distribution. This comprehensive guide will walk you through installing RHEL 10 using VMware Workstation, ensuring you set up the system correctly with GUI support
Red Hat Enterprise Linux (RHEL) 10: Key Features and Updates
RHEL 10 builds upon the strengths of RHEL 9, with new features and improvements for better performance, security, and easier management. Here are the key highlights:
- XFS File System: Supports copy-on-write, improving data integrity and performance.
- Stratis File System: Simplifies storage management with features like thin provisioning and snapshots.
- Container Tools: Updates to Buildah, Podman, and Skopeo improve container management.
- DNF for Package Management: Replaces YUM for faster, more efficient software management.
- Chrony: Replaces NTP for better time synchronization, especially in virtualized environments.
- Cockpit: Default web tool for easy system management and monitoring.
- OpenSSL 1.1.1 & TLS 1.3: Enhanced security and faster communication protocols.
- PHP 7.2: Updated support for PHP applications.
- nftables: Replaces iptables for a more modern and flexible firewall management system.
Minimum System Requirements for RHEL 10
- RAM: 4 GB (8 GB recommended)
- Disk Space: 20 GB unallocated
- Processor: 64-bit x86 or ARM system
RHEL 10 continues to be a reliable and secure platform, with improved tools for both developers and system administrators.


How to Install Red Hat Enterprise Linux (RHEL) 10: A Step-by-Step Guide
This guide provides the steps to install Red Hat Enterprise Linux (RHEL) 10 from start to finish. Follow these instructions to set up RHEL 10 in a virtual machine using VMware Workstation.
Step 1: Download the RHEL 10 ISO
- Go to the Red Hat Developer Portal.
- Create an account or log in to your existing Red Hat account.after Creating account Navigate to the Downloads section and download the RHEL 10 x86_64 DVD ISO (around 6.46 GB).
Step 2: Create Bootable Media (USB or DVD)
Once you’ve downloaded the RHEL 10 ISO, create a bootable USB drive or DVD. Use tools like Rufus or Etcher to make the USB bootable. If using a DVD, burn the ISO file using software like ImgBurn.
Step 3: Set Up a Virtual Machine in VMware Workstation
Open VMware Workstation and select Create a New Virtual Machine.,and Click on Custom (Advanced) for detailed configuration and click Next.
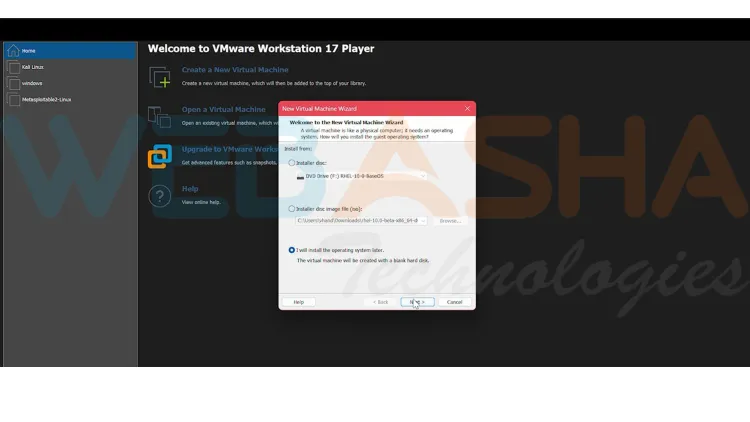


Step 4: Configure Virtual Machine Settings
- Installer Disc: Choose I will install the operating systcem later and click Next.
- Guest Operating System:
- Select Linux as the operating system.
- Choose Red Hat Enterprise Linux 8.x or later (64-bit).
- VM Name: Name your virtual machine (e.g., "RHEL 10 GUI") and specify the location to store the VM files.
- Processor Configuration: Allocate 2 processors and 2 cores per processor for better performance.
- Memory: Assign at least 4 GB of RAM (8 GB recommended for better performance).
- Network: Choose NAT to share the host’s IP address.
- Disk Setup:
- Select Create a new virtual disk with a minimum of 25 GB storage.
- Choose Split virtual disk into multiple files for better management.
- Review your configuration and click Finish.
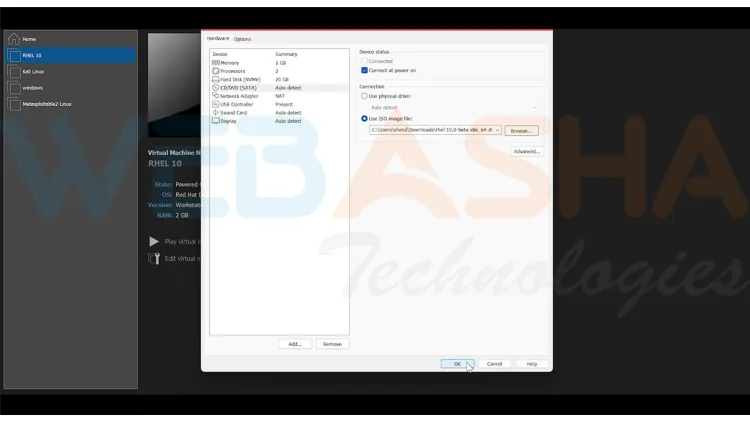
Step 5: Attach the RHEL 10 ISO to the Virtual Machine
- Select your newly created VM and click Edit Virtual Machine Settings.
- Under CD/DVD (SATA):
- Choose Use ISO image file.
- Browse for the RHEL 10 ISO you downloaded earlier.
- Click OK to save change
Step 6: Start the Virtual Machine and Begin Installation
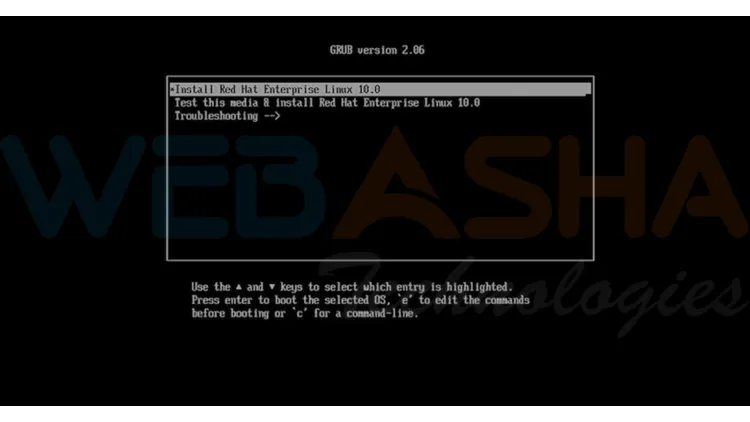
- Power on the VM by clicking Start or Power On.
- When the system boots from the installation media, select Install Red Hat Enterprise Linux 10 from the boot menu and press Enter.
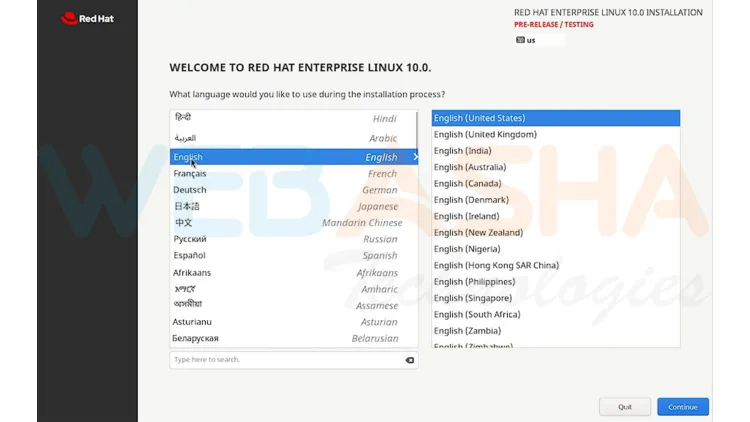
Step 7: Language and Keyboard Selection
- Choose your preferred language and keyboard layout.
- Click Continue to proceed.
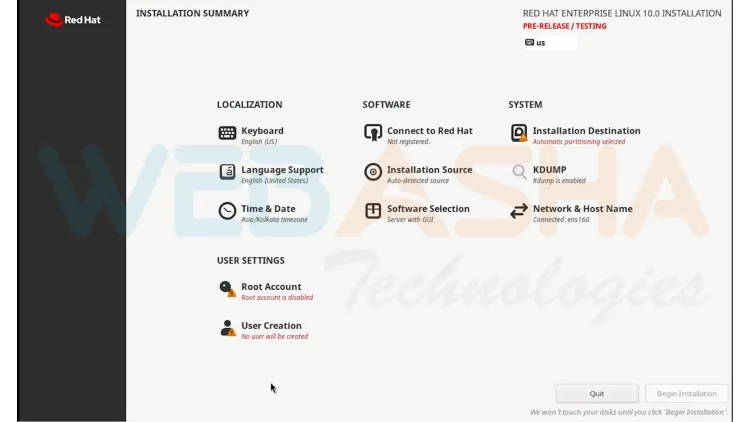
Step 8: Configure Installation Settings
In the Installation Summary screen, you need to configure the following:
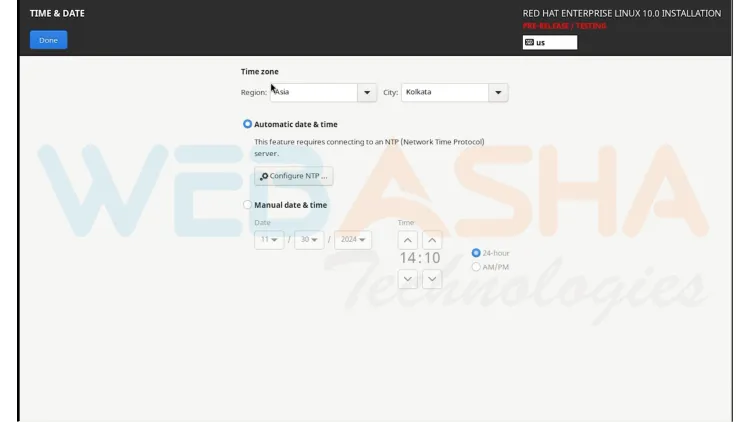
- Time Zone: Choose your preferred time zone.
- Network & Hostname: Configure your network settings and hostname.
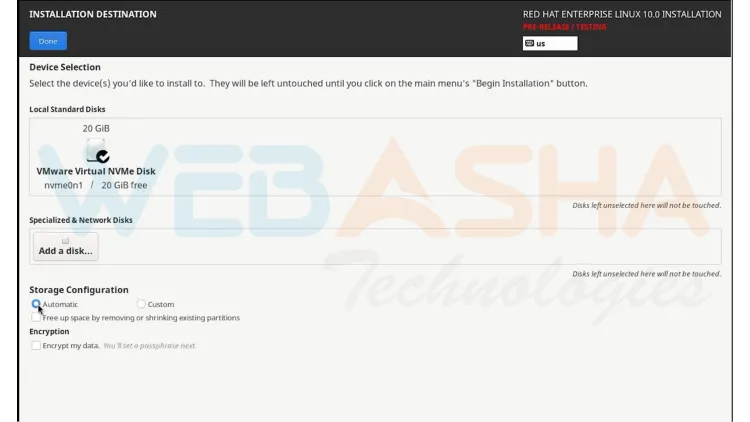
- Installation Destination: Choose the disk and enable Automatic Partitioning, or create custom partitions if desired.
Step 9: Disk Partitioning
If you choose manual partitioning:
- Click on Installation Destination and configure partitions for your disk.
- Example partition scheme:
/boot= 2 GB/= 20 GB/home= 15 GB/var= 10 GB/tmp= 5 GB- Swap = 2 GB
- Click Done once partitioning is complete.
- Note: If you don’t want to create manual partitions then select “Automatic” option from Storage Configuration Tab
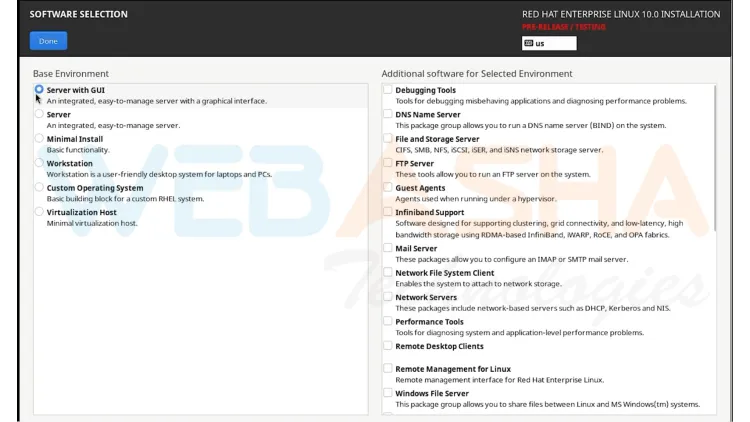
Step 10: Software Selection
By default, select Server with GUI or Workstation for a graphical desktop environment.If you want to change software options, click on Software Selection and select the environment you need.
Step 11: Set Root Password and Create User Account
Then Enable root account and Set a strong root password ,Click on Done
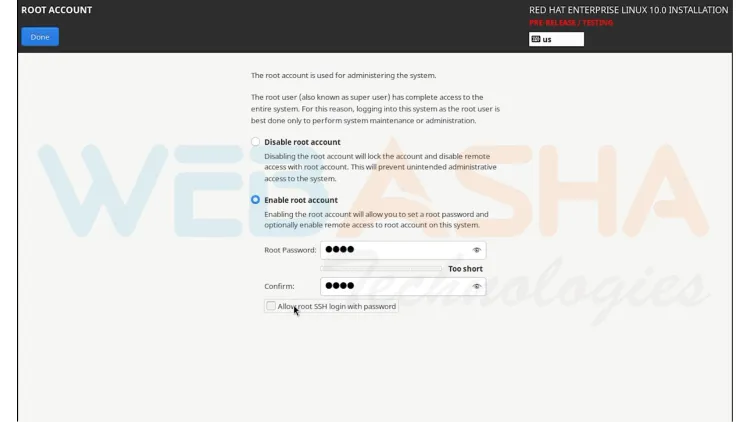
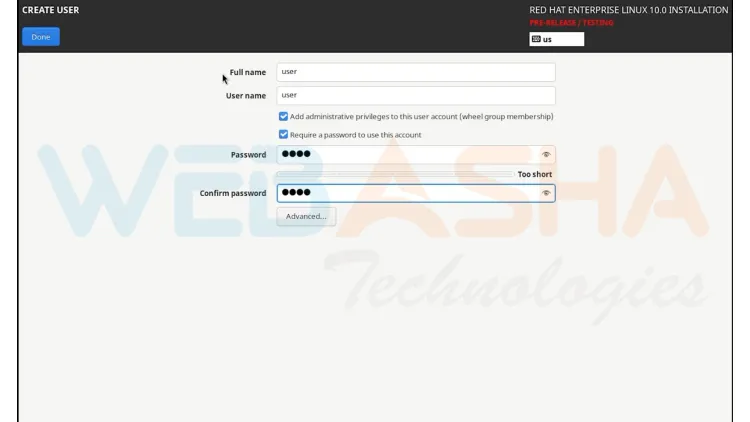
After Creating Enabling root account Create a user account with administrative privileges (check Make this user administrator).
Once done, click Begin Installation to start the installation process.
Step 12: Wait for Installation to Complete
- Wait for the installation to finish.
- Once completed, click Reboot.
Step 13: First Boot and Initial Setup
After rebooting, you will see the GUI login screen.Log in with the user credentials you created during installation.Follow the initial setup wizard to configure your system, including time, date, and other preferences.

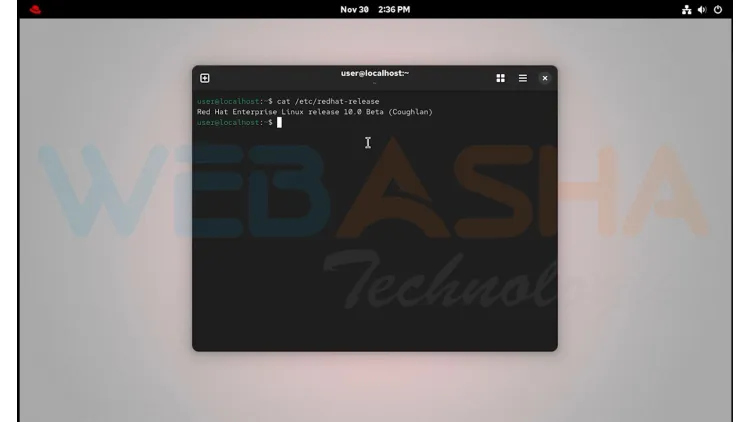
Use command cat /etc/redhat-released to view the version of RHEL 10
Step 14: Explore RHEL 10
Once setup is complete, you can start exploring the GNOME desktop environment, Cockpit management tool, and pre-installed tools.
FAQ:
-
-
What are the minimum system requirements for installing RHEL 10?
The minimum system requirements for installing RHEL 10 include 4 GB of RAM (8 GB recommended), 20 GB of unallocated disk space, and a 64-bit x86 or ARM processor. -
Where can I download the RHEL 10 ISO file?
You can download the RHEL 10 ISO file from the Red Hat Developer Portal. Create an account or log in to access the Downloads section. -
What tools are needed to create a bootable USB drive for RHEL 10?
Use tools like Rufus or Etcher to create a bootable USB drive, or burn the ISO file to a DVD using software like ImgBurn. -
Can I install RHEL 10 on a virtual machine using VMware Workstation?
Yes, you can use VMware Workstation to install RHEL 10 by creating a virtual machine and running RHEL 10 with or without a graphical interface. -
What settings should I use to configure a virtual machine for RHEL 10?
To configure a virtual machine for RHEL 10, allocate 2 processors with 2 cores per processor, assign at least 4 GB of RAM, and create a 25 GB virtual disk with the "Split disk into multiple files" option. For the network configuration, select NAT. -
What partitioning options are available during RHEL 10 installation?
During the installation, you can choose Automatic Partitioning for ease or Manual Partitioning to customize partitions like /boot, /, /home, and swap space. -
What is the recommended desktop environment for RHEL 10?
The recommended desktop environment for RHEL 10 is to select Server with GUI or Workstation during the Software Selection step for a graphical interface. -
How do I set up a root account and user account during installation?
Enable the root account, set a strong password, and then create a user account with administrative privileges by checking the "Make this user administrator" option. -
How can I verify the version of RHEL after installation?
To confirm the installed version of RHEL 10, use the commandcat /etc/redhat-release. -
What tools can I explore after completing the installation of RHEL 10?
After installation, you can explore the GNOME desktop environment, the Cockpit management tool, and other pre-installed utilities like Buildah and Podman.
-


![Top 10 Ethical Hackers in the World [2026]](https://www.webasha.com/blog/uploads/images/202408/image_100x75_66c2f983c207b.webp)